Back Focus? Sony Does Not Agree
My Sony SLT-a55V has had focus issues that I was having a hard time quantifying, as they were inconsistent. Some photos would be sharp but many others would show significant (and frequently severe) back focus, focusing on a point well behind the depth of field. My usual focusing method is to use “Local” mode, i.e. I select a specific focus point, most often the center point but sometimes one of the points on the sides. I don’t often trust multi-point focus or automatic subject recognition. If the camera focuses on the wrong subject, I want that to have been my fault, not the camera’s algorithm which I can’t predict (it usually focuses on objects closer than the main subject).
After renting a Sony 70-400mm lens and taking it on an African safari trip (photo gallery) and finding far too many photos sadly out of focus, I took most photos with this lens with manual focus and wondered why autofocus wasn’t working right. The longer the focal length I used, the fuzzier the image; only with very small lens openings were most photos even vaguely acceptably sharp. On the other hand, a few photos were absolutely tack sharp, but I couldn’t find a common reason. I initially blamed the lens and convinced the rental company to send it to Sony for service.
But after a few photos with my trusty and known-to-be sharp Minolta 135/2.8 lens showed the same problems, I experimented a little more and found pretty (IMHO) indisputable evidence of back focus under more controlled conditions.
So finally I sent the camera in to Sony for warranty repair. They inspected it, said it was “within spec” (in fact had slight front focus!), and sent it back unmodified (and missing the rubber eye cup, another story). This diagnosis was so far from correct I dug into the issues more deeply. Step one is find a way to test focus myself.
Focus Testing
Jeffrey Friedl has some outstanding photo resources, primarily Lightroom plugins but also an excellent focus test chart with clear explanations of what a good focus test chart needs to have and how to use one. Print the chart on an inkjet printer on photo paper (matte preferably) for high contrast and sharpness.
In the end, I discovered that my camera’s problem was a large variation in focus accuracy depending on which focus point I chose (and an explanation of why Sony didn’t find this). First, more detail on the testing procedure.
Focus Testing Procedure
I tested with three lenses: Minolta 50/1.7 and 135/2.8 primes, and Sony/Zeiss 16-80mm zoom. I found consistent and large back focus when using the center AF point. On a hunch, I tried testing with other AF focus points. The results were very different over different AF focus points. Using the 50mm lens, f/1.7, focus distance 80 cm to Friedl’s chart, I got roughly the following initial results:
- Right cross sensor: imperceptible focus error
- Center cross sensor: 1.5cm back focus (1/2 DoF is 0.8 cm, so this is 1x outside the DoF range)
- Left cross sensor: 3cm back focus (3x outside 1/2 DoF)
I decided to do this more carefully now as I think I understood what the underlying problem was: a tilted AF sensor unit. Testing conditions:
- Manual exposure
- Tripod
- Remote shutter release
- AF-S mode
- AF Area set to Local Area, picking from among the three cross focus points (left, center, right) where the vertical and horizontal arrays intersect in the viewfinder
- Shot at 32° angle from horizontal
Focus Testing Results
The camera was focused on the dark bar in the center of chart according to Friedl’s instructions, and I confirmed that it was unable to lock focus a bit above or below the bar. The following table gives my best estimates of where the camera actually focused by finding the sharpest digit and converting that to cm (the digits on Friedl’s chart are 0.55 cm apart; including foreshortening due to the 32° angle of the shot, convert Friedl’s digits to cm by multiplying them by 0.47). Negative numbers are back focus results, positive (if I had any) would indicate front focus results.
| Lens | Distance | f | AF Point | Result | 1/2 DoF | Error | Photo |
| 50mm | 80 cm | 1.7 | Right | 0 cm | 0.8 cm | 0x |  |
| 50mm | 80 cm | 1.7 | Center | -1.5 cm | 0.8 cm | 1.9x |  |
| 50mm | 80 cm | 1.7 | Left | -3.5 cm | 0.8 cm | 4.4x | 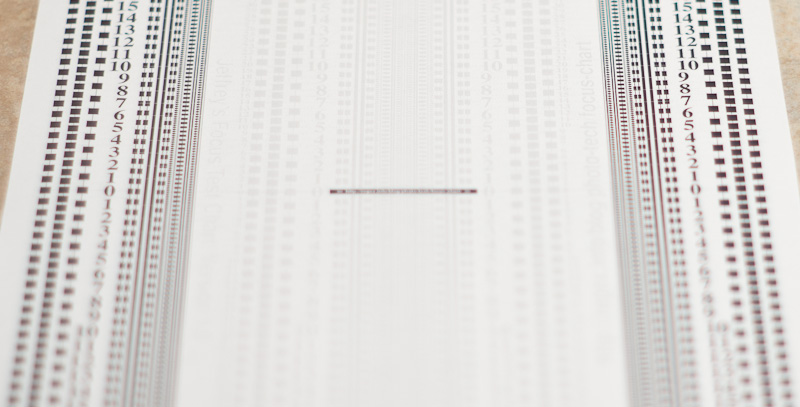 |
| 50mm | 120 cm | 1.7 | Center | -3 cm | 1.8 cm | 1.6x |  |
| 16-80mm @50mm | 80 cm | 4.5 | Right | 0 cm | 2.1 cm | 0x |  |
| 16-80mm @50mm | 80 cm | 4.5 | Center | -2.5 cm | 2.1 cm | 1.2x |  |
| 16-80mm @50mm | 80 cm | 4.5 | Left | -5 cm | 2.1 cm | 2.4x |  |
The Error column tells how many multiples of 1/2 DoF the focus point is from the ideal focus point. An error greater than 1.0 means it focused outside the DoF region (due to the complex math of DoF, this is not exactly correct, but for small DoF it is good enough). If the camera focuses outside 1/2 DoF, then the subject will not be in focus (“in focus” being defined as the blurring being less than the circle of confusion of 0.02 mm, a standard setting for the 1.5x crop factor APS-C sensor in the a55.)
I also did a quick test of every focus point with the 50/1.7. The table below attempts to show the focus results for each of the AF points in the a55’s viewfinder. Values are the number of digits on Friedl’s chart that focus is off; negative numbers are back focus, positive are front focus. This time the focus chart was shot at 45° angle, so to get actual distance in cm multiply each value by 0.55 * 0.71 = 0.39. Presumed cross focus points have values in red. The values are not as bad as the test above, but they agree in trend. Since this was a quick test, values could easily be off by 1-2 digits in either direction.
| -1 | ||||||||
| -5 | -2 | +1 | ||||||
| -3 | -4 | -2 | -1 | -5 | 0 | 0 | ||
| -3 | -2 | +1 | ||||||
| 0 |
This pattern confirms the conclusion that the AF sensor unit is correctly adjusted on one side but far off on the other side. The center sensor is halfway between. Some research led to a post on DPReview.comof someone who had figured out where the AF unit adjustment screws are. This turned out to be straightforward to do, if you take a lot of care and go at it patiently with some time to spend on it.
Adjusting the Autofocus Unit
How the AF Unit is Constructed
As with most or all DSLR cameras these days, the a55’s AF sensors are mounted inside a unit that can be adjusted as a whole. It is likely that the AF unit looks something like the figure in this post, which takes a bit of time to understand but it is crucial to knowing how to adjust the unit. The camera in that figure is a Sony A700, which is a traditional DSLR. The Sony SLT’s AF system is simpler, since it does not have an AF secondary mirror; the translucent pellicle mirror bounces the light up (not down) into the AF unit at the top of the camera. However, the AF unit itself is probably about the same, although it is at the top of the camera pointing down, not at the bottom pointing up. In any case, the light for the AF unit comes straight up from the a55’s translucent mirror, and is bounced forward by a 45° mirror inside the AF unit. The AF sensors themselves are at the front of the AF unit, facing backwards. So now we can see that the three adjustment screws have the following effects:
- The left/right pair of screws each raise or lower one corner of the AF unit where the light enters it. This serves to lengthen or shorten the path the light takes from the translucent mirror to the mirror at the light entrance to the AF unit. This is what adjusts front and back focus. If the left screw is loosened, that corner of the AF unit is pushed downward towards the translucent mirror, and the light coming in to that side of the AF unit takes a slightly shorter path to its AF sensor. This tells the camera’s AF computer that the subject is further away, and would increase back focus (or decrease front focus) for that side of the AF system. In other words: move screw in, move focus in (forward). Move screw out, move focus out (back).
- The front screw raises or lowers the front of the AF unit where the AF sensors are, without affecting the length of the light path to them. This adjustment would be used if, for example, your AF points are focusing on something above or below them (as seen in the viewfinder).
Making the AF Unit Adjustments
After prying up and removing the two small plastic covers under the pop-up flash, the three screws are exposed. They are all 1.5mm hex screws (technically 1.5mm Allen bolts), and easily accessible with a 1.5mm hex key. See below (click photo for a larger version).

SLT a55 autofocus adjustment screws
Note: “Right” and “Left” here, as is standard, refer to right and left as seen when looking at the rear of the camera. Be sure you understand that the screw on one side affects the focus of the sensor on the other side!
Turning the screws in (clockwise) moves the focus point forward (toward the camera). Loosening the screws (counter clockwise) moves the focus point back.
We have two choices here. One is to make small adjustments to the current screw settings (which is what I did initially). The other is to essentially reset the settings entirely. It is entirely your choice how to proceed. The Sony Service Manual says when installing a new AF Module to screw all three screws all the way in, then turn them out 1/2 turn each and use that as the starting point. Either way, this adjustment method will work fine. I revisited this adjustment almost 2 years later and decided to go back to the start by turning the screws all in, backing them out 1/2 turn, and starting from there. It actually was easier to converge, I think.
After a couple of iterations of this method, I like the following best. I now have the camera pulling pretty close to perfect autofocus on all focus sensors.
Setup
- Place the test chart on a flat surface at a steep angle (i.e. lying down about 30-40 degrees from horizontal). As described above, flat and perfectly aligned is absolutely critical since the differences in focus you will be measuring are just a couple of millimeters, or a tenth of an inch. Every little inaccuracy in the setup will affect the adjustment. Take your time on this step!
- Put the camera on a tripod at exactly the same height as the center of the chart, perfectly level (use the SLT’s level indicator). Select Local AF Mode and select the center sensor. Situate the tripod so the width of the test chart covers the entire frame.
- Screw all three adjustment screws all the way in (but not too tight!), then back them all out 1/2 turn.
- Put the camera in Local Focus mode and select the center sensor.
- Flip out the LCD screen to use for all measurements.
- Check that camera is level (using level indicator on EVF)
Measure and Adjust Center Sensor: Adjust Both Screws Same Amount, Same Direction
- Look at the LCD and get the camera’s active focus sensor on center focus point on the chart
- Press the shutter release halfway down to activate AF. This may require moving the camera a little to be sure it sees the focus pattern.
- Using the focus magnification feature (click the trash can button twice and use the navigation controls to move the magnifier window), look at the side scales of the chart to see where the focus actually happened. If best focus is behind the zero point (back focus), turn the two sensor adjustment screws (refer to photo above) in an equal amount. If best focus is in front of the zero point (front focus), turn both screws out an equal amount. It’s impossible to give a good guideline of how much to turn because it all depends on the specifics of your setup and the lens, f/ratio, focus distance, etc.
- Keep doing steps 2 and 3 until the best focus is right at the zero point of the chart.
We now have the center sensor perfectly focus-adjusted. The sensor may still be crooked, so we will fix that next.
Measure and Adjust Left and Right Sensors: Adjust Both Screws Same Amount, Opposite Directions
- In Local AF Mode, select the far right focus sensor
- Move the camera physically to the left so the right focus sensor indicator on the LCD is right at the chart’s center focus point. Be sure that camera is still perfectly aligned with the chart, just that the center point of the focus chart is now directly under the right focus sensor.
- Press the shutter release halfway down to activate AF and, using the focus magnifier, see where the best focus is. Do this a few times and look for an average result because the AF does not settle on the exact same location every time.
- Because we already made sure the middle of the sensor is correctly focusing in the previous step, we know that if we find that the right sensor is not right, we will need to move both adjustment screws equal amounts but now in opposite directions. So if the focus is behind the zero point, we will need to turn the right sensor adjustment screw (the left screw!!) in a little bit, and turn the other adjustment screw out exactly the same amount. Opposite for focus in front of the zero point.
- Keep doing steps 3 and 4 until focus is right at the zero point.
- Now in Local AF Mode again, select the far left focus sensor, move the camera to the right, readjust camera and tripod so everything is all straight again.
- Press the shutter release halfway down to activate AF and assess focus as above. Press a few times to see where the AF settles on average.
- If we have done a good job so far, there should be minimal adjustment to do, but nothing is ever perfect. There may be a small adjustment required… or not. If so, remember that the screws have now reversed sense from the previous step 4 because we are using the focus sensor on the opposite end. If the focus is behind the zero point, the left screw needs to be screwed in, and the right screw needs to be screwed out by exactly the same amount.
- The adjustment in step 8 should have been quite small (less than 1/10 a turn of the screws). If not, then you may have not aligned the setup with enough precision, or the camera
At this point I would highly recommend repeating all the above steps one time (without going all the way back and screwing the screws all the way in!). The second time through the adjustments should be very small.
This sounds complicated but after a couple of times through the procedure, it takes about 10-15 minutes for a full run through.
Repeat With Other Lenses
I did the initial run through the procedure using a 135 mm f/2.8 fixed prime lens and it was easy to get a quick, accurate, and consistent focus. Then I tried with my favorite CZ 16-80 f/3.5-4.5 lens at 80mm, and it is more difficult because of the increased depth of field, close focus to fill the frame, and lower contrast. It is possible that doing the test with a stronger light source would have helped, and I will have to try that next time.
A Few Points of Advice
A couple of points learned from experience:
- Always keep to Friedl’s instructions and make very sure the camera is squared against the test chart, the test chart is flat, and everything is level. I used the LCD display with grid and camera level guide turned on. The center horizontal grid line in the LCD should pass right through the chart’s focus bar and the 0 digits on both sides of the chart. The a55’s level guide on the display may be helpful to ensure the camera is level (if you know the chart is level). These are all very critical as you are adjusting focus to within a few millimeters (given that 1/2 DOF can be as small as 5 mm!), and it is easy to have the focus chart crooked by enough to make the adjustments worthless unless you are very careful about keeping everything absolutely straight.
- Use the a55’s “Local” AF area and alternate between the left and right sides of the AF array. You will constantly be going back and forth between these. You will have to either physically move the camera sideways when switching AF sides, or slide the test chart. In either case it is crucial to keep everything perfectly square, straight, and lined up over and over again — you cannot just pan the camera left and right.
- Keep very careful track of how much you are turning the screws. Always, always, always know exactly how much you have turned each screw so you can get back to where you started in case this just does not work out due to whatever reasons (lens focus or other problems).
- For initial adjustments, especially with fast lenses (f/2.8 or below), the black/white alternating patterns along the edges of the focus chart will clearly show you the DOF region on the LCD, and it is sufficient to just center the DOF region around the center horizontal grid line.
- As adjustments get finer, or your lens’ f/ratio is higher, use the a55’s focus magnification feature after AF locks, and zoom in to the chart’s edges to assess focus accuracy.
- The left/right focus adjustments are quite sensitive. The up/down adjustment (front screw) is not very sensitive.
Note on the third (front) screw adjustment, although I did not find any issue: if your left/right screw adjustments result in an overall raising or lowering of the AF unit, then the front screw should be adjusted to match the average adjustment between the left and right screws. In my case I ended up adjusting the left/right screws almost exactly in opposite directions, so did not modify the front adjustment. But if I had, for example, turned the left screw in 1/2 turn and the right screw in 1/4 turn, I would suggest adjusting the front screw in by the average adjustment, 3/8 turn, to raise the front of the AF unit by the same average amount as the rear was raised.
Results
After following this procedure, I was able to get focus on right, left and center AF points to be within 1 unit of perfect focus on Friedl’s chart for all three lenses–all within 1/2 DOF. Once left and right are accurate, the center is also. I’m sure a professional shop could do better, but part of the issue is that each lens has a slightly different focus signature and the a55 does not have the capability to customize focus for each lens as some high-end DSLRs do, so no one adjustment is ideal for all cases.
My results on real subjects were dramatically better. There is no obvious evidence of front or back focus anymore. I now have, literally, a completely different camera. Now, if only we could go on our Africa trip again…
Why Sony Didn’t Find a Problem
This explanation became clear to me while working on the adjustments. In a followup call with a Sony SLT support specialist, it was confirmed in detail.
The first thing a technician will do when diagnosing a camera is reset it to factory defaults. Among other things, this sets AF Area to Wide Area, i.e. using all focus points. The focus test consists of shooting a flat (planar) test pattern. The specialist I talked to confirmed that the one AF sensor finding the closest object to the camera will register as the subject and the camera will use that sensor’s focus determination and ignore the others.
With the tilted AF sensor I had, the left side AF sensors were telling the camera they the objects on that side were further from the camera even if physical distances were all the same, as they would be if shooting a planar focus test pattern. Therefore the camera ignored the left and center sensors in Sony’s focus test, and used the focus determination only from the right sensors, which happened to produce correct focus, and possibly even slight front focus. So my measurements detailed above match the diagnosis initially given to me by Sony from their (flawed) focus test procedure, and explains why they returned the camera unmodified.
I requested that the specialist I talked to try to change the focus test, because it lets severe focus problems pass. The test needs to test at least a few sensors individually instead of relying only on Wide Area focus to choose the sensors used. He said he’d escalate it but couldn’t guarantee anything.
Clearly Sony has a problem assessing focus accuracy in both production and support, and I would encourage other Sony DSLR owners to voice their opinions on this to Sony Customer Support if they have focus accuracy problems (and, preferably, have test data to back it up).
(And shipping the camera back with a missing piece (eye cup) is kind of unprofessional, especially since it took three weeks and three phone calls to get one sent back. Sony needs to improve here.)